It's a very common practice for e-commerce websites to have not just a single description text under your product but more than that, each part of description categorized under different tabs.
This is not very easily achievable in Shopify, unless you are ready to spend a lot of money on trying apps, and even then it doesn't always bring results and customization option you may have needed, other option left is to learn coding, but even if you are already a coder, it is not something you will do in a snap of a finger, you will need good planning of how things are going to work and then code it. Quite a tedious job.
Good news is that I have already done that, I did it for a Shopify site specifically but later found that with a few changes in my code I can make it available for everyone to use in their own.
A note to remember: While I have made this tutorial simple to understand for even non-coders to try it is still recommended not to proceed without at least taking up your theme's backup. Just in case.
For me it was vendor.js, you will find those files below "Assets" section on the theme code editor
Open the files with .js extensions and look for mention of "jQuery" in the files, if you find it, it means you can append the custom code I am about to give you right into this file and it will work,.
Copy the entire code and place it inside of a code editor or text editor program of your choice.
On line number 8 you will see this code statement:
The


This is a barebone markup, no content, nothing, because the JS code we earlier installed will run on page load and fill it with the content.
Where to put it? You have to check the code in product-template.liquid / product.liquid and see where your description code is, under there you can place the above code and save it. I know the explanation is a little vague, but all themes may different in file names and it is not possible for me to have one common instruction for everyone, so you have to figure out, either with the help of an expert or yourself (contact me on depy45631@gmail.com if you want professional help at low costs.)
The CSS code can be added in any CSS file from the assets files in your theme code. Find a .css file, you will have to make sure that CSS file is the main CSS file for the theme or a CSS that is used in the theme, so that the CSS code does apply on the live site.
At the end of the found CSS file, paste the above code and save it.
Now in the CSS code I have given three themes that you can use, one is default, other two are theme-2 and theme-3, to change the look you will have to add a class name to the barebone HTML we added in the last step.
Theme 1 (Default):

Theme 2
Theme 3
The text in the description editor will look like this. The tab title will be any text between -- -- for example --Details--
Anything below that and before the next line of text that matches the same pattern will become that tab's content.
This is not very easily achievable in Shopify, unless you are ready to spend a lot of money on trying apps, and even then it doesn't always bring results and customization option you may have needed, other option left is to learn coding, but even if you are already a coder, it is not something you will do in a snap of a finger, you will need good planning of how things are going to work and then code it. Quite a tedious job.
Good news is that I have already done that, I did it for a Shopify site specifically but later found that with a few changes in my code I can make it available for everyone to use in their own.
A note to remember: While I have made this tutorial simple to understand for even non-coders to try it is still recommended not to proceed without at least taking up your theme's backup. Just in case.
Things you will need
- A theme that has jQuery added to it. Our custom code requires JavaScript cod that uses jQuery functions, so it is important we have it.
- Preferably a nice code editor, such as Sublime Text, it will make handling snippets of code easier.
Now let's go ahead and do some coding.
Find the JS file
The JavaScript code is the major part of this whole tutorial, it is what does all the work of taking a plain HTML description text and converting it into an interactive tabbed product description body.
For our code to work we need to put it below wherever the jQuery code is in our theme. You can do that by following this method:
- Go to your Shopify admin panel
- Click on "Online Store" on the left pane
- Then on "Themes" under it
- Now on the theme preview section you will see a drop down button called "Action", click on it and choose "Edit Code"


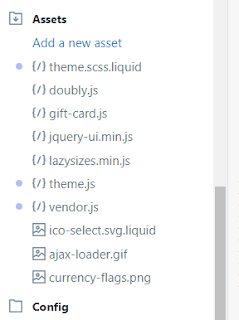
The above steps took you to your theme code editor, on the left panel you will see the list of all files that makes up your entire theme, assets files, sections, snippets and layout templates of different pages like product, cart etc.
What we are looking for is the JavaScript file, now if you are using a custom theme the structure of the files may vary, but it is mostly a standard to put the JS codes inside files like
vendor.js or script.js and maybe even main.jsFor me it was vendor.js, you will find those files below "Assets" section on the theme code editor

Open the files with .js extensions and look for mention of "jQuery" in the files, if you find it, it means you can append the custom code I am about to give you right into this file and it will work,.
The JS Snippet
Here's the custom JS code we need to place at the bottom of the file we just found to have jQuery in it.
 /*
 * product tab js
 * @author: Deepak Kamat (https://stramaxon.com)
 */

 $( document ).ready(function(){

  var productDescriptionHTML = $(".product-single__description").html();
  var toPutContentIn = "";
  var productTabCount = 0;

  $(".product-single__description > *").each(function(){
   // Check if this is a tab
   if ( $(this)[0].tagName == "P" && (/^--[a-zA-Z]+--$/.test( $(this).text() ))  ) {
    var tabname = removeHyphens($(this).text());
    // Insert Product tab link
    var dataTarget = "product-tab-" + myslugify( tabname.trim() );
    var newLink = "<a href='#' data-target='"+ dataTarget +"'>" + tabname + "</a>";
    $(".product-description-tabs .tabs-link-btns").append( newLink );

    var newTabContent = "<div class='product-tab-content' id='"+ dataTarget +"'></div>";
    $(".product-description-tabs .description-tabs-content").append( newTabContent );
    toPutContentIn = dataTarget;
    productTabCount++;
   } else {
    if ( toPutContentIn.length ) {
     $("#" + toPutContentIn).append( $(this) );
    }
   }
  });

  if ( productTabCount ) {
   $(".template-product .content-block").hide();
   $(".product-description-tabs").show();

   changeProductTabFocus( $(".product-description-tabs .tabs-link-btns > a").data("target") );
  }


  $("body").on("click", ".product-description-tabs .tabs-link-btns > a", function(e){
   $(this).parent().find("a").removeClass("active");
   $(this).addClass("active");
   var thisTarget = $(this).data("target");

   $(".product-description-tabs .description-tabs-content .product-tab-content").removeClass("active");

   $("#" + thisTarget).addClass("active");

   e.preventDefault();
  });

 });

 function myslugify(text) {
   return text.toString().toLowerCase()
     .replace(/\s+/g, '-')           // Replace spaces with -
     .replace(/[^\w\-]+/g, '')       // Remove all non-word chars
     .replace(/\-\-+/g, '-')         // Replace multiple - with single -
     .replace(/^-+/, '')             // Trim - from start of text
     .replace(/-+$/, '');            // Trim - from end of text
 }

 function removeHyphens(str){
  return str.replace("--", "").replace("--", "");
 }

 function changeProductTabFocus( target ) {
  $("a[data-target='"+ target +"']").parent().find("a").removeClass("active");
  $("a[data-target='"+ target +"']").addClass("active");
  $(".product-description-tabs .description-tabs-content .product-tab-content").removeClass("active");
  $("#" + target).addClass("active");
 }
Copy the entire code and place it inside of a code editor or text editor program of your choice.
On line number 8 you will see this code statement:
var productDescriptionHTML = $(".product-single__description").html();
The
.product-single__description is the class name selector for out existing product description container, it is important that we have it correct since this is where our code will fetch the original description text. Now in most themes .product-single__description is standard for the container of product description, but in case it is something different on your theme you may have to replace it with the class name of according to your theme.A bit of HTML now
With the above steps you have the JavaScript code that we needed in place, but it needs an HTML skeleton which will be used as a container for the product description tab's HTML. We will put that where we want our product descriptions tab to show up.
In most themes, the structure of product description text is like this:

But in case of a product description tabs, we may want to put it at a different location, likely below the product page's top columns, like this:

Where your product description tabs will appear solely depends on where you put the following HTML in your product template files.
Copy the HTML we will need:
<div class="product-description-tabs" style="display: none;">
  <div class="tabs-link-btns">
  </div>

  <div class="description-tabs-content rte">
  </div>
</div>
This is a barebone markup, no content, nothing, because the JS code we earlier installed will run on page load and fill it with the content.
Where to put it? You have to check the code in product-template.liquid / product.liquid and see where your description code is, under there you can place the above code and save it. I know the explanation is a little vague, but all themes may different in file names and it is not possible for me to have one common instruction for everyone, so you have to figure out, either with the help of an expert or yourself (contact me on depy45631@gmail.com if you want professional help at low costs.)
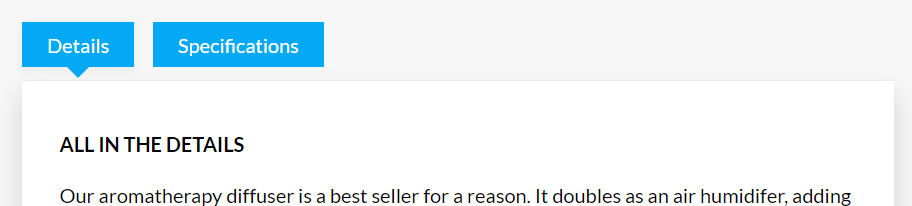
Styling of the tabs
The final part is to give the tabs a good look. Right now, without the CSS it may look like a mess. With the following CSS you will change that.
Copy the CSS
.product-description-tabs {
    padding: 20px;
    margin: 20px auto;
}

.product-description-tabs .tabs-link-btns {
    margin-bottom: 00px;
    display: -ms-flexbox;
    display: flex;
    flex-wrap: wrap;
    border-bottom: 1px solid #eee;

}
.product-description-tabs .tabs-link-btns a  {
    position: relative;
    display: block;
    font-weight: 600;
    padding: 10px 20px;
    background-color: #fff;
    color: #252f56;
    border-radius: 5px 5px 0 0;
    color: #333;
    text-decoration: none;
    margin-right: 10px;
}


.product-description-tabs .tabs-link-btns a:hover,
.product-description-tabs .tabs-link-btns a.active {
    background-color: #eee;
}

.product-description-tabs .description-tabs-content {
    background: transparent;
}
.product-description-tabs .description-tabs-content .product-tab-content {
    padding: 20px;
    border: 1px solid #eee;
    display: none;

}

.product-description-tabs .description-tabs-content .product-tab-content.active {
   display: block;
}

/* Theme 2 */
.theme-2.product-description-tabs .tabs-link-btns a  {
  background-color: transparent;
  font-weight: 400;
  margin: 0;
}

.theme-2.product-description-tabs .tabs-link-btns a:hover,
.theme-2.product-description-tabs .tabs-link-btns a.active {
  font-weight: 700;
}


/* Theme 3 */
.theme-3.product-description-tabs .tabs-link-btns a  {
  background-color: transparent;
  font-weight: 400;
  margin: 0;
  border-radius: 0;
  margin-bottom: 10px;
  background-color: #03a9f4;
  color: #fff;
  margin-right: 15px;
  line-height: 1;
}

.theme-3.product-description-tabs .tabs-link-btns a span {
  position: relative;
  z-index: 1;
}

.theme-3.product-description-tabs .tabs-link-btns a:after {
  content: "";
  position: absolute;
  left: 50%;
  bottom: -5px;
  width: 15px;
  height: 15px;
  background-color:#03a9f4;
  transform: translateX(-50%) rotate(45deg) translateY(-5px);
  opacity: 0;
  transition: 0.1s all ease-in-out;
}

.theme-3.product-description-tabs .tabs-link-btns a.active::after,
.theme-3.product-description-tabs .tabs-link-btns a:hover::after{
  opacity: 1;
   transform: translateX(-50%) rotate(45deg) translateY(0px);
}

.theme-3.product-description-tabs .tabs-link-btns a.active {
  box-shadow: 0 2px 8px rgba(0,0,0,0.05);
}


.theme-3.product-description-tabs .description-tabs-content .product-tab-content {
  background-color: #fff;
  border: 0 solid;
  box-shadow: 0 12px 20px rgba(0,0,0,0.15);
  padding: 20px 30px;
}
The CSS code can be added in any CSS file from the assets files in your theme code. Find a .css file, you will have to make sure that CSS file is the main CSS file for the theme or a CSS that is used in the theme, so that the CSS code does apply on the live site.
At the end of the found CSS file, paste the above code and save it.
Now in the CSS code I have given three themes that you can use, one is default, other two are theme-2 and theme-3, to change the look you will have to add a class name to the barebone HTML we added in the last step.
Theme 1 (Default):
<div class="product-description-tabs" style="display: none;">
Theme 2
<div class="product-description-tabs theme-2" style="display: none;">
Theme 3
<div class="product-description-tabs theme-3" style="display: none;">
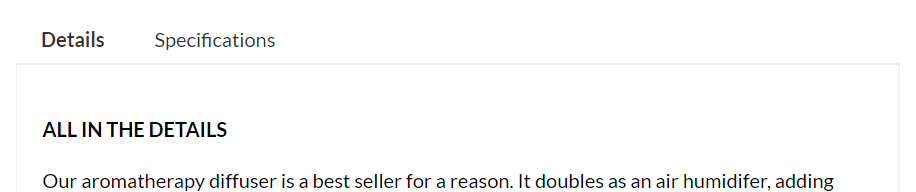
Final step, formatting your description
The final step is to format your description text for your products so that the JS code can parse it and convert it into a tabbed element. And for that you do not have to do any coding there, all you have to do is write the description in a certain way, like this.--Details--Lorem ipsum dolor sit amet, consectetur adipiscing elit. Praesent lacinia arcu lectus, vel varius eros porta in. Fusce in tortor tincidunt, interdum mauris ut, fermentum nunc.
--Additional Info--Curabitur nec lacinia odio, ut interdum risus. Quisque consectetur luctus diam et consectetur. Proin at nulla ligula. Quisque et urna leo. Donec eget turpis et diam sollicitudin iaculis. Phasellus sollicitudin ullamcorper sodales. Morbi laoreet ante at sapien pharetra, eu eleifend justo semper. Morbi nibh nibh, auctor et gravida eget, ornare eget nisi. Phasellus dictum volutpat pellentesque. Proin vitae tellus nec velit feugiat tincidunt eu sed dui. Vestibulum feugiat eros et porttitor dictum. Vestibulum ante ipsum primis in faucibus orci luctus et ultrices posuere cubilia Curae; Vestibulum ante ipsum primis in faucibus orci luctus et ultrices posuere cubilia Curae; Duis semper, leo sed maximus mattis, massa erat fringilla dui, in bibendum ante tellus id tellus.
--Another Tab--
Etiam vitae pharetra turpis, sed condimentum sem. Pellentesque gravida augue id justo ornare cursus. Donec vitae porta leo. Nam nec orci eu est fermentum consequat. Vestibulum mollis nisl et magna elementum, non semper turpis feugiat.
The text in the description editor will look like this. The tab title will be any text between -- -- for example --Details--
Anything below that and before the next line of text that matches the same pattern will become that tab's content.
Want help with setup? Let's talk!
If you are looking for help with setting up this code or you are looking to customize the looks and function of this product description tabs according to your liking then you can hire me to do the job for you, email me on depy45631@gmail.com to discuss.